High Concept:
Xbox360 Controller is used to control a RC Car and mounted camera.
Details:
I ripped out the car's original circuit board and hooked up the Arduino to the car's drive and steering motors. A motor controller is used to control the motors.
I wrote a C++ program which runs on a laptop. The program uses an input library called Object Oriented Input System.
The program reads input from the Xbox360 controller and sends data serially over an Xbee radio to another Xbee radio on to the Arduino. The serial library is called CSerial.
Below is the supply list. After writing this I now realize what a costly venture this was.
The program reads input from the Xbox360 controller and sends data serially over an Xbee radio to another Xbee radio on to the Arduino. The serial library is called CSerial.
Below is the supply list. After writing this I now realize what a costly venture this was.
Supplies:
Arduino Duemilanove.........................$30
Arduino Duemilanove.........................$30
2 x Xbee Pro 60mW ............................$25 each
2 x Xbee Adapter Kit ...........................$10 each
2 x 2.4GHz Duck Antenna ...................$10 each
2 x Interface Cable .......................$5 each
USB FTDI Cable ...................................$20
Motor Controller.................................$5
Wireless Video Camera........................$45
Wireless Video Camera........................$45
Pan and Tilt Kit.................................$35
Easy Cap USB Device.........................$7
9.6 V Battery Packs and Charger........$35
Battery connector set


Laptop
Xbox 360 Wired Controller
Finished
Product:
Source Code:
Download here. I have included the Visual Studio Solution for the C++ code as well as the .pde file for the Arduino sketch.
I apologize in advance, the C++ project is a mess. The serial library required MFC classes, which frustrated me to no end. After spending hours just trying to get the most rudimentary example to compile I got fed up and thus did not take the time to pretty things up. The important code is in ArduinoCar.cpp. That file itself is dirty because I had to hack in the OIS code to read the controller input. There is a lot of code in there that assuredly doesn't need to be in there.
Car.pde is much cleaner and is no doubt the most important part of the source code.
If you are looking for any code related to the video signal, please note that the video camera and the receiver were stand alone components and thus have no source code. I looked into transmitting video through the Arduino and several sources recommended just going with a standalone set. I would agree with this recommendation.
Abandoned Bluetooth
In the video, I use a bluetooth modem for communication from the laptop to the Arduino. I chose bluetooth because my laptop already had bluetooth capability which means that all I needed was a single unit for the Arduino on the car. Not only that but I had read that the bluetooth modem was a snap to setup, while the Xbee radios seemed to have some confusing configuration process. It turned out that the bluetooth modem was very easy to get up and running. However, the maximum distance for communication only seemed to extend about 100ft. Because of this, I decided to abandon the bluetooth and try the Xbee Pro radios with a duck antenna attached. Now the range is much farther (tested excellent at 300ft.).
Bluesmirf Gold Bluetooth Modem...........$65
Better Steering
In the video, the steering is not very good. This is because I did not understand the steering mechanism at the time. The wires for controlling steering literally were coming from a black box. I had to experiment with the 6 wires that were coming out of the box to find out which ones controlled the steering motor. For a long time afterward, I had 4 unused wires just sitting there. It wasn't until much later that I investigated what those wires did. I completely disassembled the steering box, but it was worth it. I found that the remaining wires were attached to a potentiometer. After finding this out, I was able to read the voltage coming off the pot to determine the position of the car's wheels. With that information I was able to make the wheel rotation pretty much go one to one with the Xbox controller's left joystick. This was a vast improvement over the first steering implementation.
In the video, the steering is not very good. This is because I did not understand the steering mechanism at the time. The wires for controlling steering literally were coming from a black box. I had to experiment with the 6 wires that were coming out of the box to find out which ones controlled the steering motor. For a long time afterward, I had 4 unused wires just sitting there. It wasn't until much later that I investigated what those wires did. I completely disassembled the steering box, but it was worth it. I found that the remaining wires were attached to a potentiometer. After finding this out, I was able to read the voltage coming off the pot to determine the position of the car's wheels. With that information I was able to make the wheel rotation pretty much go one to one with the Xbox controller's left joystick. This was a vast improvement over the first steering implementation.
Pictures:
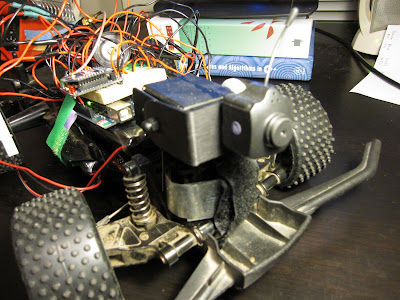
Side view of the Creeper Bot. You can see the camera up front and the duck antenna hanging off the back. You can also see the two battery hookup cables. The bottom battery drives the car's motors while the top battery drives the camera, camera servos, the arduino, and the Xbee radio.

This is a close up of the camera and camera servos.

This shot shows the bread board on top of the Arduino, which is on top of the battery pack. Everything is held down by a velcro strap that loops around the car.
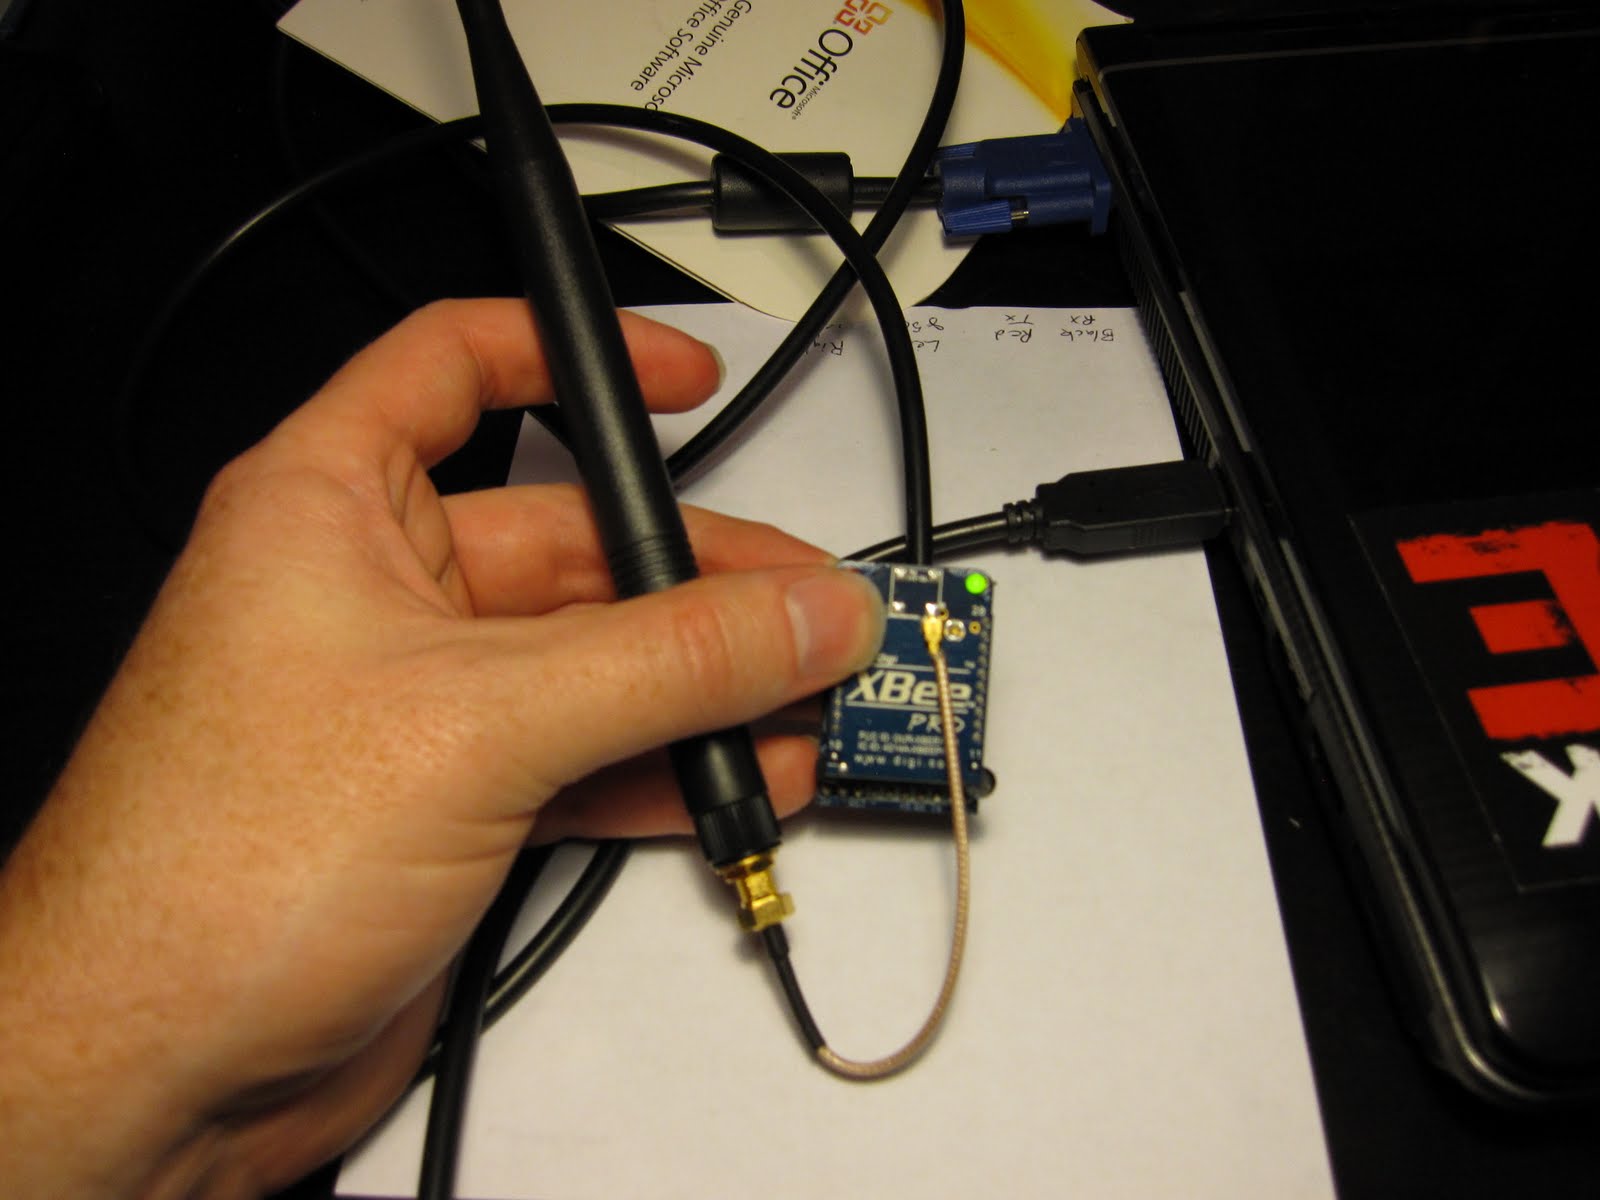
This is a shot of the Xbee that connects to the laptop. The Xbee Pro module fits into the Xbee Adapter which hooks up to the computer via the USB FTDI cable. The huge duck antenna attaches to the Xbee with the interface cable.

This is a shot of the Xbee that is attached to the car. It is attached to the Xbee Adapter that is attached to the bread board.
This is a top down shot of the bread board. The left side of the pic is the back of the car. That chip on the far left of the bread board is the motor controller. One side of the motor controller controls the drive motor, while the other side controls the steering motor. The arduino sends signals to the the motor controller to control the motors.
Earlier Videos:
Here is an early video of the Creeper Bot. At this stage of the project the Creeper Bot is hooked to the computer with a USB cable. Also, everything ran off of the USB power.
RC Car Controlled by Arduino and Xbox360 Controller from Dan Howery on Vimeo.
Power:
The motors run off a 9.6V RC Car battery. The arduino, pan/tilt servos, and camera run off a seperate RC car battery. I like using the rc car batteries because I can plug them into the charging wire without removing them from the car. It makes charging this thing a snap.
In this video I revised the controls a bit. Rather than have the left stick control forward/backward and the right stick control left/right, I made it so that the left and right triggers control forward/backward and the left stick controls left/right. This allowed me to tie the camera controls to the right stick later on.
Revised Controls for Arduino Xbox 360 RC Car from Dan Howery on Vimeo.